
New Zealand/Australia Customers Only
With Kitomba™ you can LinkUp your point of sale with Eftpos.
Kitomba integrates with the following Eftpos systems in both NZ and AU:
- DPS (used for Windcave in Australia)
and also the following Eftpos systems in NZ only
- Verifone
- Eftpos NZ
- Hypercom
- Cadmus
- Provenco
NOTE: DPS is the only one that sends information both ways. (ie. Kitomba sends a message to the Eftpos terminal, which in turn sends a message back to Kitomba). The other Eftpos systems receive the message from Kitomba but you need to manually accept.
Then, once the transaction has processed, your Eftpos terminal will tell Kitomba™ if the transaction has been approved or declined.
Before you Begin
Before you can start using your Eftpos machine with Kitomba™ you will need to find out some information about what equipment you already have. You will need to give your Eftpos supplier a call and find out what kind of Eftpos machine you are using so that we can verify if it will be compatible with Kitomba™. Your supplier may also need to provide you with some extra equipment so that your Eftpos machine can be connected to your Kitomba™ system. Once you have all of this information, please give us a call and we can help you get underway with installing Eftpos LinkUp.
Getting Started
Once you have your Eftpos equipment sorted the next step is to activate Eftpos LinkUp for Kitomba™. You will need to contact someone from the Kitomba™ helpdesk to provide you with a code that will unlock Eftpos on your system. Once Eftpos LinkUp is activated you will need to do a few setup tasks in the Kitomba™ Admin Tab before you can begin to use Eftpos. Once again, you will need to speak with a Kitomba™ technician during this setup phase to ensure that everything is configured correctly.
Eftpos Preferences
Click on the Admin tab.
Select Card Link from the left menu and choose the correct preferences for your setup.
Remember to click Save in the bottom right.
Setting payment preferences
Now, select Payment Types from the left menu of the Admin tab.
You will need to tell Kitomba™ which Payment Types are Electronic and can be sent to the Eftpos Terminal.
You do this by clicking on each Payment Type and ticking the box that says Electronic Payment
You can allow Clients to take cash out on some Payment Types, by ticking the box that says Allow Cash Out (if available).
If you need to create more Payment Types:
- Select the Payment Types folder in the left hand menu
- Click the Create button at the top of the page.
Within Kitomba™, the addition of Eftpos LinkUp won’t affect the way you invoice your clients. You can still create Invoices, or Make Sale on an appointment as you have always done, however when you choose any electronic payment method, you will get a pop up box.
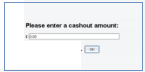
Enter in the amount and select the OK button.
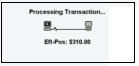
This screen shows that the information is being sent to your Eftpos Terminal. When this screen appears, it is usually time to swipe your customers card.
Once the card has been actioned you will either get and accepted or declines notification.
![]()
![]()
If you see this screen, the Eftpos terminal is processing and you should wait for it to finish on the pinpad. This may happen if you cancel a transaction while it is being processed or manually accept/decline a transaction while it is being processed.
![]()
This screen will appear if your Eftpos machine is already busy before you start your transaction. If you have more than one Kitomba™ using the same Eftpos Terminal, someone else may be trying to put through a transaction at the same time as you. Alternately, you may need to contact the help desk for assistance as there may be a problem with your hardware setup.
![]()
Comments
0 comments
Please sign in to leave a comment.